We no longer support this browser. For an optimal experience, we recommend updating your browser.
Get help with the CenturyLink email update
In October 2022, we moved all CenturyLink email accounts to a new service. Here are some resources to help you with that move:
CenturyLink email server settings
| Incoming Server (IMAP recommended) | IMAP: mail.centurylink.net, Port: 993, Security: SSL POP: pop.centurylink.net, Port: 995, Security: SSL |
| Outgoing Server | SMTP: smtp.centurylink.net, Port: 587, Security: TLS if available |
Frequently asked questions
Moving to a new email platform allowed CenturyLink to provide a better email experience, including enhanced spam protection, mobile-friendly layout, and other improved features.
Yes! If you recently became a Brightspeed customer, you can keep your CenturyLink email. To keep your account active, you just need to sign in at least once in every 365-day period.
Following the transition to our new platform, you may need to reenter your email username and password and make sure you have the correct server settings in order to reconnect to your mail app. See the section below for instructions on updating server settings for different operating systems.
If you are having issues connecting, please chat with CenturyLink Email Support M-F 9 am-6 pm CST. Should you need support outside of these hours, follow the instructions in the chat to submit a help request form.
If you are missing some of your email folders, don't worry - they haven't been deleted or lost. There are two possible solutions for this issue:
1) In many cases, a re-sync of your IMAP folders will allow the rest of your email folders to move successfully. And don't worry if you don't know what any of that means - just follow our detailed instructions below!
2) If you completed a re-sync and still do not see all your folders, it may be caused by an issue with folder names containing special characters (such as # * & @). We're aware of this issue, and are expecting a complete fix by November 14.
If you are still missing folders from your inbox after November 14, please chat with CenturyLink Email Support M-F 9 am-6 pm CST for more assistance. Should you need support outside of these hours, follow the instructions in the chat to submit a help request form.
How to change spam selection for messages
Identify an email as spam
Spam controls are at the highest setting by default. If you get an email that should have been caught as spam you can notify our spam monitoring team in two different ways:
1. Select the white box to the left of your email and select Spam

2. Open the message and then click on the shield icon in the top right corner of the message screen.

Change a valid message from spam to inbox
Spam controls are at the highest setting by default. Rarely this can cause some valid emails to be delivered to the Spam folder instead of your Inbox. With just a few steps you can ensure future emails from a valid sender are not placed in the Spam folder.
1. Select the Spam folder in webmail
2. Open the email message
3. Select the red highlighted option that says This is not Spam
You will see a confirmation at the top of your webpage highlighted in yellow that confirms the change.
How to update server settings
If you already have CenturyLink email set up on your device or for your chosen program, you may need to update the server settings. Click to open step-by-step instructions for each type of device.
If you have not yet set up CenturyLink email on your device, you'll see a link in the section below for each type of device.
The following screenshots and instructions are from a Samsung Android 10 device. Your device settings may differ slightly.
1. Open the Email application.

2. Tap the three bars to open the menu on the left for your CenturyLink email account.

3. Open the settings by tapping the gear icon in the top corner.

4. Scroll down to the Advanced Settings section and select Server Settings.

5. Enter your email address and password in the Account section, then verify that the Incoming Server settings are correct for POP or IMAP (your choice):
IMAP Server: mail.centurylink.net
Security Type: SSL
Port: 993
POP Server: pop.centurylink.net
Security Type: SSL
Port: 995

6. Next, verify the Outgoing Server settings:
SMTP: smtp.centurylink.net
Security Type: TLS
Port: 587


7. Select Done to save your settings and complete the update.
The following screenshots and instructions are from an iPhone X. Your device settings may differ slightly.
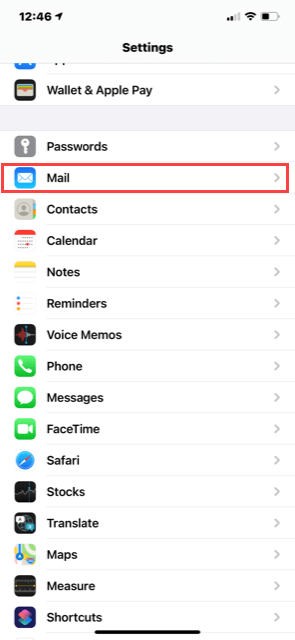
1. To update your email account settings, open your main device Settings menu.
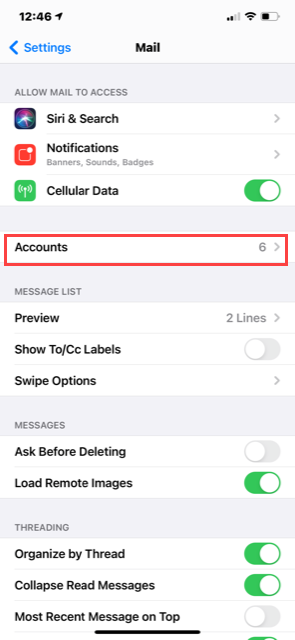
2. Select Mail.
3. Select Accounts.
4. Select the email account you want to update. Your information will be different from the sample image.

5. Select the email account again for POP or IMAP. In the example image, the email has been selected for IMAP.

6. Verify the incoming and outgoing server settings:
Incoming Host Name: mail.centurylink.net
Outgoing SMTP: smtp.centurylink.net
You will also need to re-enter your password for the incoming and outgoing mail server. Be sure to enter the same password in both fields.

7. Select Done to save your settings and complete the update.
1. Open Microsoft Outlook and click File in the top left corner.

2. Under Account Information, select Account Settings, then choose Server Settings from the drop-down.

3. Enter your username (CenturyLink email address) and password. Verify the settings for Incoming mail:
Server: mail.centurylink.net
Port: 993
Encryption method: SSL/TLS

4. Now open the Outgoing mail settings and verify the server information:
Server: smtp.centurylink.net
Port: 587
Encryption method: TLS if available
When you've check that all the above information is correct, click "Next."
5. Outlook will send a test message. Once it's finished, you'll see Account successfully updated. Click Done to exit.
The following screenshots and instructions are from Windows 11. Your device settings may differ slightly.
1. To update your email account settings, open the Windows Mail app. You can search from the Start menu, if needed, to locate the program.

2. Select the gear icon in the bottom corner to open Settings.

3. From the Settings menu, select Accounts.

4. Select your CenturyLink email account from the list of available accounts.

5. Select Advanced and scroll to the Sync Options section. Verify that the server settings are as follows:

6. Select Done to save your settings and complete the update.
NOTE: Email setup can vary by operating system. The steps on this page are general. If you have trouble, refer to the instructions for your specific operating system.
Missing folders in Outlook? Try this.
If you use Outlook to manage your email and you are not seeing some of your email folders following the update, don't worry - they haven't been deleted or lost. You may simply need to resubscribe or re-sync your folders. Click to open the instructions below.
1. In Mail, find the navigation pane (usually on the left side) that shows your inbox and all your email folders. Right-click on the Inbox folder associated with your CenturyLink account.
2. Select IMAP Folders from the drop-down.

3. In the IMAP Folders window, click the Query button.

4. A list of all your folders should appear. Select all the folders you want to appear in Outlook. To select multiple folders, hold down the [Ctrl] or [Command] button on your keyboard as you click on the names.
5. Once you have all folders selected, click the Subscribe button, and then click OK at the bottom to save your changes.
If you completed the steps above and still do not see all your folders, it may be caused by an issue with folder names containing special characters (such as # * & @). Please chat with CenturyLink Email Support M-F 9 am-6 pm CST for more assistance.
Where is my trash/junk mail folder?
Are you looking for your trash or junk mail folder? It's not missing. It's now labeled "Spam" and you won't see it unless there's a message in it.
The new email allows you to manage your spam delivery options, including hiding it from your inbox.
1. Click the Gears icon located at the upper right corner of the email and select the Mail tab.
2. Select the Junk Mail subcategory.
3. Choose one of the following options to manage your spam:
a. Deliver spam to Junk Folder (spam gets deleted after 7 days)
b. Deliver spam to Inbox (turn off Junk Mail rule)
c. No spam delivery (delete all spam)
Exclusive Delivery Options
1. Choose one of these exclusive delivery options:
a. Default (Most junk mail is caught)
b. Exclusive (You will only receive email from addresses listed in your contacts or safe list.)
Click Save.

If you are having any further issues related to the email update, visit the CenturyLink Email Support site to chat. Chat is open M-F 9 am-6 pm CST. If you need support outside of these hours, follow the instructions in the chat to submit a help request form.
CenturyLink Email Support
Visit our dedicated email support site.
Sign in to check email, browse news, and more.
Keep your CenturyLink email active
Like many free web-based email services, unused CenturyLink email accounts are deactivated after a certain amount of time. To keep your CenturyLink email active, be sure to log in at least once a year. Accounts with no activity for more than a year will be deactivated and all contents deleted.
Top Tools
Was this information helpful?
Support topics
About Lumen | About CenturyLink | Careers | Investor Relations | Newsroom | Legal | Privacy Notice | Tariffs | Customers with Disabilities | Site Map | Cookie Settings | CenturyLink in Your Area | CenturyLink.net | Quantum Fiber in Your Area | White/Yellow Pages | Centurylink Retailer
Residential | Small Business | Enterprise | ©2024 CenturyLink. All Rights Reserved.