We no longer support this browser. For an optimal experience, we recommend updating your browser.
Setting up your Premium WiFi network
For CenturyLink® Fiber Internet service connected with this equipment:

If you have pods that look like this and no WiFi service...

If you have CenturyLink Fiber Internet service with a SmartNID and WiFi pods, this page will show you how to claim and set up new pods using the CenturyLink app.
A technician will set up your new Premium WiFi system after you order.
Use these instructions for swapping, adding or replacing a pod on an existing network.
Download the CenturyLink app
If you do not yet have the CenturyLink app, you'll need to download it now. You'll use the app to add your new WiFi 6 pods and use all the features of Premium WiFi.
Download the My CenturyLink app
1. Plug in the pods
Unplug the current pods and replace them with your new pods.
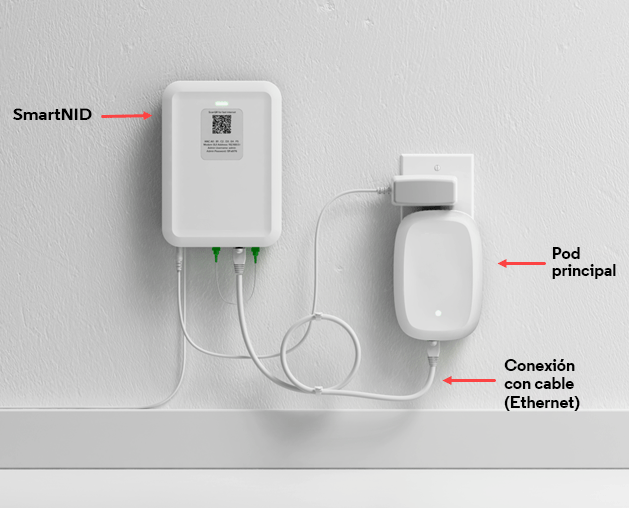
1a. Choose one of the new pods to be your wired (primary) pod.
- Plug the new Ethernet cord into a port on the bottom of the pod (Q9500WK).
- Plug the other end of the cord into a WAN/LAN port on the bottom of the SmartNID.
- Now plug the pod into a working power outlet.
1b. Plug in the second pod wherever your other pod was.
2. Register the pods
Add the new pods to your network by registering them in the My CenturyLink app.
2a. From the My Services section of the CenturyLink app, scroll to the bottom and tap Register a new WiFi pod.

2b. A pop-up will ask you to allow camera permission to scan the QR code or barcode for the new pod. Tap OK to proceed.

2c. Scan the code. You can use the app to scan the QR code or the barcode on the box your new pod arrived in.


2d. If you prefer, you can enter the serial number on your new pod instead of scanning the code. This is case sensitive, so use capital letters.

2e (optional). Name the pod. You can name your new pod to make it easier to identify. For instance, use the name of the room or the devices connected to it.

After you've scanned the code or entered the serial number, the app will find and add the pod to your account. This may take a few moments. You'll know it's successful when you see a green message at the bottom of the My Services screen.

3. Change your WiFi password
After you've claimed the new pod(s), you need to change your WiFi password.
Note for Windows 10 devices - Password requirement
If you have a device running on the Windows 10 operating system, your WiFi password cannot contain any apostrophes (') or quotation marks ("). If these characters are used in your current password, please remove them and save a new password in order to connect devices and see your WiFi pods in the app.
This is only for Windows 10.
3a. Go to the My Services screen from the menu at the bottom of the app, then scroll down the screen to find your WiFi network. Tap on the network to see details.

3b. Tap to Edit network from the WiFi Network screen.

3c. On the Edit WiFi Network screen, enter the new network name and/or password, then tap Save.

4. Connect your devices
Top Tools
Was this information helpful?
Support topics
About Lumen | About CenturyLink | Careers | Investor Relations | Newsroom | Legal | Privacy Notice | Tariffs | Customers with Disabilities | Site Map | Cookie Settings | CenturyLink in Your Area | CenturyLink.net | Quantum Fiber in Your Area | White/Yellow Pages | Centurylink Retailer
Residential | Small Business | Enterprise | ©2024 CenturyLink. All Rights Reserved.