Your WiFi network name (SSID) and password (key) are used when you connect devices to WiFi. Customizing the network name can make it easier to identify your WiFi network, and creating a strong password is a good way to secure your home network.
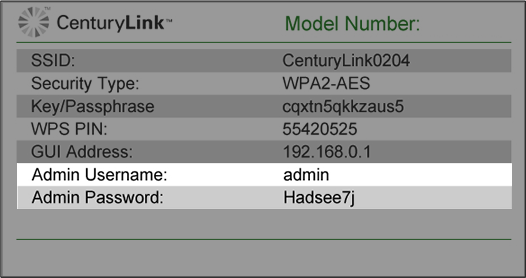
You can find the Admin Username and Password printed on the sticker attached to the side, back or bottom of the modem.
CAUTION!Do not remove your modem sticker. It includes your default Admin Username and Admin Password, which cannot be retrieved if lost. Your modem could become unusable without them.
4. Select Wireless Setup in the main menu.
Video: How to change your WiFi password
Continuing from above:
5. Select SSID Setup
6. Select the SSID you want to change. You can find your SSID printed on your modem's label. Typically, the first one in the drop-down list is your main home network.
7. Select Broadcast SSID to make the network visible on any device within range.
8. Enter a new network name. The SSID cannot contain spaces. Remember that this will be visible to others, so it should not contain private information or clues to your password.
9. Select Apply to save your changes.
Note: For some dual-band routers, you may need to change the settings for each network one at a time. Once you get to the Wireless Setup menu, select “2.4 GHz” and then “5 GHz,” and repeat the same steps on both.
6. Select the name of your wireless network (SSID). You can find the SSID on the label on the side or bottom of the router. Typically, the first one in the drop-down list is your main home network.
7. Select the security type shown on the equipment label. For some modems, security type may appear in the "SSID Setup" menu instead.
WEP Note: You should use the strongest encryption that is compatible with your network. WEP should only be used if your devices are NOT WPA compatible.
9. Select Use Custom Security Key/Passphrase and enter your new password in the box. You can also change this at any time back to "Use Default Security Key/Passphrase" to return the password back to the one printed on the router label.
Password tips
If you are given the option of 64 bits or 128 bits, follow these guidelines:
64 bits: Enter 10 characters*
128 bits: Enter 26 characters*
* Characters can only contain letters between A-F and numbers between 0-9 with no spaces.
In all other cases, your custom password must:
Be between 8 and 63 characters long
Contain at least one number from 0 to 9
Contain at least one letter from A to Z
Note: The space character can be used (but is not required)
10. Select Apply to save your changes.
Note: For some dual-band routers, you may need to change the settings for each network one at a time. Once you get to the Wireless Setup menu, select “2.4 GHz” and then “5 GHz,” and repeat the same steps for both.